Guide:Setting Up a Workspace
Setting up a decompiled workspace can help not just extract assets to view and mess with, but can also provide a good way to create your own in the environment.
DISCLAIMER: Decompilation is not piracy. It does not provide ANY granted permission to redistribute, nor is its deconstruction guaranteed to be 1:1 with the original project. A decompiled workspace is for the purpose of creating an environment that makes development of modified assets easier.
Decompiling
AssetRipper, a fork of uTinyRipper, is an actively-maintained and updated decompilation tool for Unity games. Ever since 2.0.0, it now has the capability to properly extract data for Unity 5.6 and below, which includes this game's version--Unity 5.4.
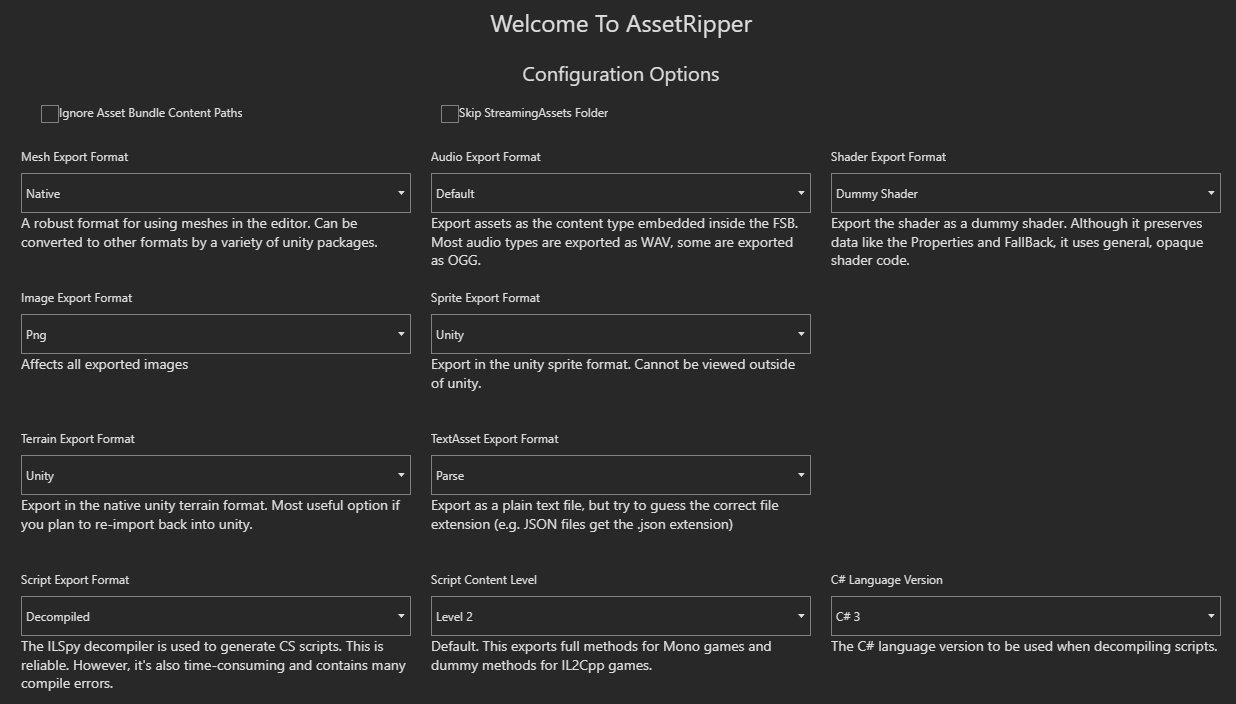
Under releases, download the latest GUI version, as we'll be using this for this guide. Extract it to any folder, preferably where you keep your programs (i.e. C:\AssetRipper for Windows). Run the application, and adjust the settings to match the image (the only thing that's changed is the C# version):
Now head to where the game is installed. This can be found via Steam by right-clicking on the game, going to "Manage," then "Browse local files." Drag the .exe onto AssetRipper's window, and let it scan through all the game's assets. When it shows that you can view assets on the left for their information, you should be clear to move on.
At the top of the window, click "Export," then "Export all files." Find a location to extract the game, preferably in your Documents folder. Let it run until the export is complete.
Patches
Before the game is ever run, we should make some patches of our own to save ourselves some errors. Because some assemblies don't decompile well, we're replacing them with the DLLs. Inside the directory you extracted the game to, there is a new folder called "dyingsun." Open this, and go to AuxiliaryFiles/GameAssemblies. Copy all DLL files to your clipboard except:
- Any files starting with "UnityEngine," "System," or "Assembly-CSharp"
- mscorlib
- Mono.Security
Now, go back to the root folder and head to ExportedProject/Assets/Scripts. Delete all folders except the ones beginning with Assembly-CSharp, and paste your DLLs inside this folder. Rename the files beginning with "Assembly-UnityScript," and change their names so they don't create a conflict, preferably just "UnityScript." This should be it as far as substitution goes.
Now for some script changes, since decompilation is not perfect.
Assembly-CSharp
- Comment out lines 93 through 101 (inclusive) in Moments/Recorder.cs. This is due to an issue with ILSpy not doing particularly well with ldtoken opcodes.
- On line 908 in Rewired/UI/ControlMapper/ThemeSettings.cs, set the num's default value to _textSettings.style, casted to an int as said cast is not implicit for enums.
- On line 122 in TrailMesh.cs, cast trail.trailType to an int.
- On line 211 in UIPlayAnimation.cs, cast playDirection to an int.
- On line 15 in RealTime.cs, add "&& Application.isPlaying" to the if statement.
- At the very beginning of UpdateSelf on UIPanel.cs (line 782), add the following lines:
if (!Application.isPlaying)
    return;
Assembly-CSharp-firstpass
Head back up into the Assets folder, and enter Plugins. This folder should be there.
- On line 66 inside FMOD_StudioSystem.cs, change "Util" to "FMOD.Studio.Util," otherwise the engine will try and pick the no-namespace one.
Now the workspace is ready to go.
Finishing touches
Add a folder to Assets called "Custom"; this is where all your new content should go.
Add another folder to Assets called "Editor", and add a new C# script called "BundleBuilder." Inside the script, add the following code:
using System;
using System.IO;
using UnityEditor;
using UnityEngine;

public class BundleBuilder {
    [MenuItem ("Assets/Build AssetBundles %&b")]
    static void BuildAssetBundles () {
        string bundleDir = "Assets/AssetBundles";
        if (!Directory.Exists (bundleDir))
            Directory.CreateDirectory (bundleDir);
        try {
            BuildPipeline.BuildAssetBundles (bundleDir, BuildAssetBundleOptions.StrictMode, BuildTarget.StandaloneWindows);
            // Clean up manifest files as we do not need them
            DirectoryInfo dir = new DirectoryInfo (bundleDir);
            File.Delete (bundleDir + "/AssetBundles");
            // The asterisk is null-inclusive
            foreach (FileInfo file in dir.GetFiles ("*.manifest*"))
                file.Delete ();
            // Refresh to update and add the new files to the project
            AssetDatabase.Refresh ();
            Debug.Log ("AssetBundles were successfully built.");
        }
        catch (Exception e) {
            Debug.LogError ("AssetBundles could not be built due to the following exception: " + e.ToString ());
        }
    }
}
Now, whenever "Build AssetBundles" in the Assets menu is selected, or Control-Alt-B is pressed, asset bundles will be built.
Adding the workspace
Duplicate the ExportedProject folder, and then rename it to whatever you want--this is so that we can have a backup in the event something goes wrong, or you want an entirely new project. Open Unity Hub, and under the "Open" dropdown, select "Add project from disk." Navigate to where your duplicate project is located, select it, then add it. You may not have Unity 5.4.0 installed, so it's recommended you use the Archive Downloads. You can use any patch higher than 5.4.0 (i.e. 5.4.6 but not 5.5), in fact it's recommended for stability as it resolves some security issues. Higher patches are compatible with the game if you wish to create asset bundles.
Final steps
- It's recommended to add a dedicated folder for your project. Inside "Custom", add a folder with your project name in it. You may also choose to add a folder with your username, and add your project folder there. All new assets should go here.

